1 Introduction
The represented tool allowing to show the arts/models showcase for the 3D artist with web Unity player and also to create the demonstration presentations on any subjects.The tool have a wide set of settings which it will be necessary to will be modified as required and inquiries.
In a package there is already adjusted scenes ready to use, remains only to add the models following the applied instruction.
Feachers
- Splitting objects into categories
- Playing of animation from the list
- The rotating camera with different settings
- Automatic adding objects in prefabs by Tag
- Automatic camera rotation
- Automatic switching of objects
- Simple settings for a scene
- Draw description of 3d model
- A choice of several scenes directly during viewing (3 simple scenes)
- Customisable UI scene elements
- Usage tutorial and video
Result we can see on this video:
2 Usage guide
Firstly, add unitypackage in the project.
Open ShowRoom scene from Scenes folder.
Select "RootEmpty" prefab in the "Prefabs/Roots" folder project. Make copy for own scene and drag to the scene. You will see the Primary and the BaseGUI scripts.
Primary (Script)
Main parametr in this script is Obj Categories. It is a list of all objects splitted on categories.
At start we should add own object|3d models or prefabs in the project.
If some objects are available animation, add to them "Animation" component and add in animations array your animation clips.
When they are added you can modify Obj Categories.
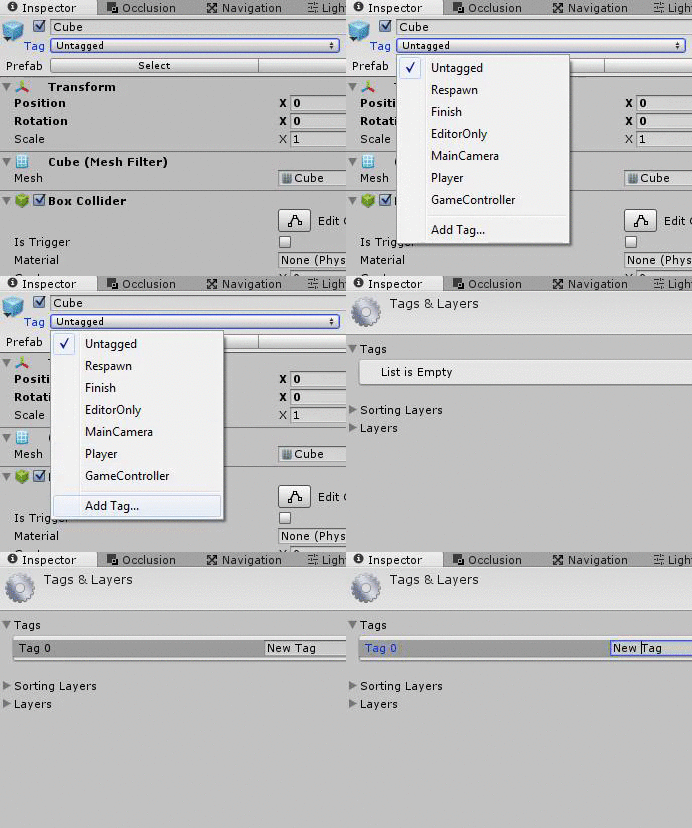
1) Add all objects to the scene and create your own Tag for them.
2) Select all objects and set created Tag.
3) Select Root object and open Primary component. You will see some buttons. But previosly you should set your objects tag in Objects Tag submenu.
Set Destroy objects after addition trigger to true if you want to automatic delete all objects from scene when they added to the list.
4) Click on Add Objects to Category by Tag button.
Script create Asset/Prefabs/MyTag_Prefabs folder and save all taging objects as prefabs. Now taging objects from scene aren't necessary any more.
In Obj Categories created special category of object with your Tag.
5) Now you can add/change description/name/animation for all objects in selected category.
6) Click to Aplly button for save root prefab. (It is important)
Save this scene as MyShowRoom.scene, for example. Now you can play and see result.
BaseGUI (Script)
BaseGUI controlling all UI action in show room. At the moment you can change only 4 special UI groups.
Prev Next Group - draw two button for switching object
Description Group - draw name and description text about current object
Prev Next Group - draw two button for switching object
Description Group - draw name and description text about current object
Anims Group - draw animations list for current object and button play/stop
Category Group - draw categories list.
You can change position/size/drawing/content position/content size to all 4 UI group.
Main Scene Light - add there scene light to controlling light intecity in game.
Draw Debug GUI Layers - need for tests where was click|touch in game. If on gui layer - we will not rotate the camera. For reposition and resizing set Draw Debug GUI Layers trigger to true.
Show Scenes - add your scenes to this array and you can switching them in game from SceneSettings UI group.
CameraOrbit (Script)
Camera Orbit script component is in MainCamera object, but you can add this script on other object. Script automaticaly find Camera.main object.
Previosly, create new special emptyObject or use CameraPoint object in RootEmpty prefab and set to Target.
Target - center of rotation of the camera.
Use Auto Rotation Mode - if this mode active you can not rotate camera.
Use Auto Rotation Mode On Idle - automatic camera rotation activationg when no touches.
See also the video tutorial how to add models in show room:Use Auto Rotation Mode - if this mode active you can not rotate camera.
Use Auto Rotation Mode On Idle - automatic camera rotation activationg when no touches.
3 Video instructions
See the video tutorial how to modify UI groups in show room:
4 Additional Info
See also my other asset packs:Camera Pack
Transform Randomizer
Contact details below:
vadakuma@gmail.com
2015.


I have read your article, it is very informative and helpful for me.I admire the valuable information you offer in your articles. Thanks for posting it..
ReplyDeletevisual studio c#
In this piece we will take you through some few overviews of some platforms you can use to practice 3D animation. Text in CATIA sketch
ReplyDeleteReverse engineering is the process of re-manufacturing of a product using its existing design and manufacturing process. But reverse engineering is only possible when the original manufacturer of the product is no more or they stopped manufacturing the product. Reverse engineering Calgary, Alberta
ReplyDeleteIsolating substance from introduction and capacity in the design lessens the push to change any of the three later. race car modeling
ReplyDelete